Rekeying a cylinder is normally a process that involves a follower to remove the plug in order to complete disassembly. Some companies have developed “windows” or other seemingly novel ways to cut down the complication of repining a cylinder. But from the get go, it is easy to re-pin than a Pacific Lock Company cylinder. While this article goes through a detailed ‘how-to’, the process can be simply summed up in five steps:
1. Insert “old” working key and rotate key 180 degrees
2. Hold cylinder so that the “old” bottom pins fall out
3. Remove the “old” key and insert “new” cut key
4. Drop in the new bottom pins
5. Rotate key 180-degrees and remove. Done.
It can even be said that it’s really just a two-step process - drop the old pins and put in the new pins! There is no need to remove a retaining clip, or use a follower to pull out the plug, or even worry about top pins and the associated spring. What is a five to ten-minute job with other cylinders is a two minute job with PACLOCK.
Walking step by step through the process above, let’s take our time and show the details.
Step 1: Insert “Old” Working Key & Rotate Key 180-Degrees.
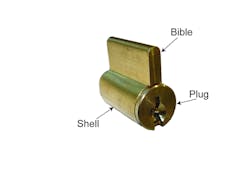
Once the cylinder is removed from the padlock, it becomes obvious how simple the design is. Because PACLOCK’s default cylinder type is a 6-pin cylinder (other manufacturers ship 5-pin by default and charge more for a 6-pin), all of our cylinders are pinned that way. The cylinder has a face, plug, shell, and bible (see Figure 1).
Contained within the cylinder are the bottom pins, top pins, and the pin springs. One word of warning is that this expedited rekeying method relies on the need to keep the top pins securely locked in the bible section until the rekeying is complete. Otherwise should the top pins “fall” into the chambers without a bottom pin, you’ll have to take the cylinder apart.
In this step, we take our old key put it into the cylinder and then rotate the key 180 degrees. This does two things. First, it pushes the top pins up to the shear line and cleanly into the bible. Secondly, it rotates the bottom pins around to the loading area (see Figure 2) so that they are available for manipulation. Note that the pins are flush with the shear line.
Step 2: Hold Cylinder so that “Old” Bottom Pins Fall Out
Just as the title of this step says, turn the cylinder so the holes are pointing down so the old bottom pins fall out. Those who are truly advanced can combine this step with the previous step.
Step 3: Remove the “Old” Key and Insert “New” Operating Key
I won’t insult anyone’s intelligence by actually explaining this step. The thing to keep in mind is that without a key in the keyway, the top pins are eager to drop into the chambers without bottom pins. This would be unfortunate and force the cylinder to be completely unassembled. Don’t allow the plug to rotate without either bottom pins or a key inserted.
Step 4: Drop in the New Bottom Pins
As an example, if our new key has a code of 93001 then that gets decoded into a pinning of 513437. One at a time, insert the appropriate bottom pin into the correct chamber with the point facing down. Once a pin is inserted it becomes relatively apparent whether the pin is the correct size for the particular cut of the key. The top of the bottom pin must align with the top of the plug.
For example, in Figure 4, it looks like our first two pins are just fine (flush with the shear line). In Figure 5, however, our third pin is sticking out of the shear line and, therefore, won’t allow us to rotate the cylinder. Either check the pin or check the key because something is not matching up!
Once all of the new bottom pins are dropped in and appear to be flush with the shear line, we are ready for the last step.
Step 5: Rotate Key 180 Degrees and Remove. Done.
Just as the title says, rotate the key back around so that the plug is in its original starting position. You’ll hear the top pins re-engage with the bottom pins. Remove the key and test.
After a few times, this entire six-step process becomes a two-step process and takes a minute or two at the most.
No tools are necessary and there’s no need to completely disassemble the cylinder - just a simple way to increase your productivity with PACLOCK. Because a PACLOCK can be keyed into American Lock and Master Lock systems, PACLOCK’s pins are interchangeable with theirs. If you already own an American Lock pinning kit, then you are ready to rekey a PACLOCK.
For more information, contact PACLOCK at 888-562-5565 or Web site: www.paclock.com
