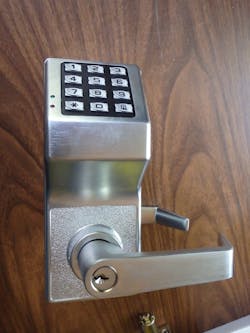
5 Shortcuts to Trilogy T2 Programming
The Alarm Lock Trilogy T2 is an easy-to-install Grade 1 cylindrical (tubular) push-button lever lock that easily replaces typical knobs and levers on most doors.
Half-day classes are available that help to explain the 12-plus pages in the instruction booklet, but T2s are easy to program for customers who want basic functions, such as changing the master code or enabling passage mode. In fact, a good selling point is that you can show your customers how easily they can program their own T2s with basic functions.
For customers who want this flexibility and timeliness, I give them the instruction booklet along with the following shortcut “cheat” sheet to five basic functions.
1. Change Master Code
Note: On the keypad, Alarm Lock uses an AL symbol rather than a pound (hashtag) sign. Now do the following:
- Enter the existing master code
- Press the AL button
- Press 1
- Press the AL button
- Enter the new master code
- Press the AL button
- Re-enter the new master code
The master code can be four, five or six digits. However, the entry (user) codes must be the same number of digits as the master code.
2. Add User Code
- Do the following:
- Enter the master code
- Press the AL button
- Enter the new zone number (01, 02, 03, etc.)
- Press the AL button
- Enter the new entry (user) code
Each T2 lock accepts nearly 100 different user codes, and each code gets its own zone number within the lock. The person who has the master code keeps a list of user codes along with their respective zones. For the first nine codes entered, use zones 01 through 09. The next nine codes get 11-19, then 21-29, then 31-39, etc. Don’t assign zones 10, 20, 30, 40, etc. Those are for manager codes (submaster codes), and as with a regular masterkey system, submasters typically aren’t necessary .
Say you want to add the first user code 4545 to the lock. It will be zone 01. Say you want to add 3366 to the same lock. It will be zone 02. The next code gets zone 03. Each time you add a user code, it gets its own zone.
3. Remove User Code
Do the following:
- Enter the master code
- Press the AL button
- Enter the zone number
- Press the AL button
- Press * (star symbol)
4. Enact Passage Mode
Do the following:
- Enter the master code
- Press the AL button
- Press 4
- Press the AL button
5. Enact Locking Mode
Do the following:
- Enter the master code
- Press the AL button
- Press 5
- Press the AL button
Additional Tips
If the door has been drilled for a 2-3/8-inch backset, the T2 escutcheons are wide enough to cover the new holes after you redrill the door to accept the 2-3/4-inch Grade 1 latch. Narrower doors (generally interior) will require the T2 spacer plates (two per box), ordered separately.
Knowing that each user code requires its own zone is key to understanding the instruction manual. The manual has instructions for programming nearly three dozen functions, and, if all else fails, there’s a function for erasing all programming!
Michael C. Tritel, the owner of Lively Locks & Dead Bolts, can be emailed at [email protected]
