Your customer gets an attractive, ADA-friendly way to access his or her door, with the reliable operation of all Adams Rite hardware. You have an easy retrofit installation that can be accomplished in as little as 15 minutes. It’s a win-win situation for any aluminum door application.
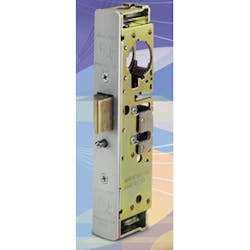
As part of a long tradition of improving and expanding its line of door hardware, Adams Rite recently introduced the new 4900 Reversible Deadlatch. Its innovative engineering enables installers to reverse its 5/8”solid brass latchbolt by simply removing a screw with a standard screwdriver. But that’s only the beginning. Other key features include:
• Armored front with adjustable bevel
• Tube spacer with through-the-front hex key adjustment
• One piece cast latch holdback
• E-Z Glide rollers on main and auxiliary latch
• Removable screw-fastened tube spacer brackets for tab mounting
• Ships with both radius and flat faceplates
This article will cover the step-by-step procedure for installing the 4900 Reversible Deadlatch (Photo 1), along with a 4591 Deadlatch Paddle. It will demonstrate a retrofit to an existing deadlock equipped with a thumbturn and exit indicator (Photo 2). This deadbolt/thumbturn/exit indicator is typical of what you may encounter when retrofitting to the 4900 Reversible Deadlatch. (View all article images on a new page)
In the finished installation, the new Adams Rite 4900 Reversible Deadlatch is paired with a 4591 Deadlatch Paddle.
Step 1 – Prepping the Stile
In this retrofit example, we’ll need to remove the existing hardware to prep the stile. After removing the faceplate to access the setscrews, remove the thumbturn and outer cylinder. (Photo 4) Note: You can reuse the cylinder when installing the deadlatch.
Remove the exit indicator (Photo 5) and the lock (Photo 6). Now you’re ready to prep the stile, which is as simple as drilling two holes: one 21/64” diameter hole, 1-9/32” above the cylinder centerline, for installing a binder post for the paddle, and one hole for a #10-32 screw, 3-19/32” below the cylinder centerline, for mounting an adapter plate. (Photo 7). Before you install the deadlatch, you’ll need to first install one of the two binder posts that comes with the paddle (Photo 8). Note: If you were performing a new installation, you would use both posts.
Step 2 – Deadlatch Preparation and Options
The 4900 Reversible Deadlatch is boxed with both flat and radius faceplates, strike and machine screws for mounting. Order cylinders, paddle, handle or latch pull separately. Shipping weight is 1-1/4 lbs (Photo 9).
Both flat and radius faceplates are supplied. Flat faceplates can also be adjusted in the field for right or left beveled edge doors. (Photo 10). Adjustments are accomplished by rotating the faceplate adjusters to the desired left or right hand position (Photo 11).
To set the handing of the bolt, simply remove the set screw, extract the bolt, turn it to the left or right hand position and replace the screw (Photos 12 and 13). If you are tab mounting the 4900, the brackets for the tube spacers are also easily detached by removing a screw (Photo 14).
Step 3 – Installing the 4900 Reversible Deadlatch and 4591 Deadlatch Paddle
Make sure the tube spacers are set properly so that the faceplate will be flush when you finally mount it. (Photo 15). The tube spacers can be easily adjusted through the front with a hex key. Now, secure the deadlatch in the stile with two screws, using the existing mounting holes that held the MS lock (Photo 16). Next, mount the 4591 adapter plate on the stile, and proceed to install the paddle escutcheon on top of the adaptor plate (Photo 17). Install the paddle by inserting the supplied pivot pin and tightening the set screw. Re-install exterior cylinder and secure with set screw. The final step in mounting the latch is applying the appropriate faceplate. (Photo 18).
Step 4 – Installing the Strike
To prep the strike cutout, you can measure the dimensions or simply use the strike itself as a template (Photo 19). Drill and countersink the two holes required and make the cutout, filing down any rough edges (Photo 20). Next, install the mounting plate supplied with the strike (Photo 21). Finally, attach the backing on the strike with the dust box on the top before mounting the strike to the jamb. (Photo 22).
That’s all there is to it. Your customer now has an attractive, ADA-friendly way to access his or her door, with the reliable operation of all Adams Rite hardware. You have an easy retrofit installation that can be accomplished in as little as 15 minutes. It’s a win-win situation for any aluminum door application.


