I get many phone calls at my business from customers who ask a simple question: Do you install security cameras?
If you believe that cameras are too difficult to install, you aren’t alone. Many cameras are on the market, and it can be confusing to order something that will satisfy the customer’s expectations. As a result, many locksmiths might not understand how easy it actually is to install a camera.
Selecting a security camera that’s easy to install and is reliable and profitable is key. Cameras that generate income after the installation are more appealing than cameras that are a one-off installation. One company I use, Alarm.com, makes it simple for me to make money on the installation and then over the life of the camera through recurring monthly revenue (RMR).
Camera Basics
Let’s talk about how the camera works. Like the human eye, cameras can see a wide range of colors and motion, and they have a limited night-time view. Cameras have night vision, but it’s limited in distance and detail — much like the human eye and a flashlight. Several camera models have artificial intelligence behind them, which allows the camera to act more like the human brain and identify vehicles, animals and humans.
Cameras see motion through pixel changes. Pixels, like the dots on the screens of your computers, TVs and other devices, are how we measure the quality of an image. Higher pixel values mean that the image or video will be clearer when it’s recorded. Currently, we measure cameras in megapixels (MP), and you’ll see many cameras starting out at about 2.1MP, which is roughly equivalent of 1080p, or high definition, for those who are familiar with TV resolution.
The recording of images and video taken by a camera also is affected directly by the megapixel value of a camera. A few calculators can assist you with designing local storage (think: DVRs) for camera systems, but we’ll keep things simple here. Alarm.com records in video clips, and the number of clips is how they determine storage for your customer accounts.
Planning the Installation
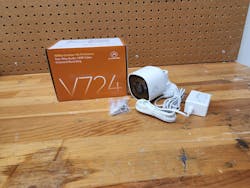
Like the human eye, a camera lens has a focal length, or field of view (FOV), that the camera can see. Here’s an easy way to see what a 2.8mm FOV camera, such as the 724V, can see: Close one eye and look at a 45-degree angle without moving your head. It helps to put your hand against your nose to create a wall. What you see is what the average 2.8mm camera will see, and knowing this will help you to decide where to put the camera.
Another technical aspect to consider is the height where you’ll place the camera. The height of the camera will affect how far it can see an object clearly. Ever stand on the top of a two-story building and try to identify a person? It’s easier when you’re on the ground, and cameras are the same way. Cameras have to be close to the object they’re trying to view. A typical installation should be no more than 15 feet high, the lower the better to capture your subject.
(IPVM is an excellent resource for camera information, news and planning software for placing cameras and getting information. Find more information at https://ipvm.com/.)
The V724, as are many other models, is Wi-Fi-enabled. In addition to finding the right spot for the camera to deliver images and video, make sure that you’re getting at least three out of four bars of Wi-Fi, not cellular, service at that location. If the signal is too low, you’ll have to install a Wi-Fi booster — or have an internet/IT guru in your area install one for you. Alarm.com has a few options for reliable boosters that work with their cameras.
The V724 also requires 12 volts of DC power to operate and comes with a 1-amp power supply, so you just plug the camera into a standard outlet. The length of the power cord is adequate for most installations where the camera is above an outlet. On an installation where you’ll mount the camera at a longer distance, you’ll want to provide a power supply and use 18/2AWG cable to avoid a voltage drop.
Making the Installation
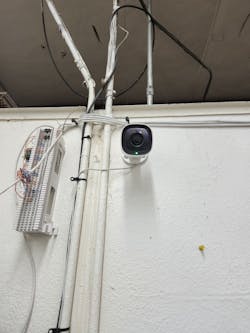
The V724 comes with three mounting screws and can be mounted flush on the wall with the cord inside a surface-mount wire mold, or you can fish the wire through the wall to conceal the wire. Each application is different, and you always should put the wire where it will be protected and out of the way. This particular camera was installed in my shop, and I used zip ties to follow the existing surface-mount conduit to the power outlet. (Image 2)
After the camera is mounted, you just plug it in and watch the power light. If it doesn’t come on, unplug the camera and check your wiring. A blinking red light means the camera is booting up; blinking white means the camera is ready to connect to your phone and be programmed.
While you wait for the camera to boot up, you can add your new customer via your smartphone or computer (unless you took care of this ahead of time). After you add the new customer, the camera should be ready for connection to the local network.
Next, log into the local network with your phone or tablet. Open up the Alarm.com Mobile Tech app and navigate to the Add Device section in the customer account under Equipment. (Image 5) Click Add Device, select the device type (Images 6 and 7) and you should see the new camera listed and an Update and Install button. Name the camera and then click Update and Install. (Images 8 and 9)
After the device is added, your customer will be able to log into their account and look at the device and set up recording rules. That’s all there is to it. The camera is ready to start capturing images and video. (Image 10)
Alarm.com supports other security products and services, and it provides training. Getting set up is simple: Just reach out to your local Alarm.com rep, or email me at the address below. Alarm.com didn’t pay me to write anything here. In fact, I use a combination of systems and platforms in my business to support my customer demands.
I believe that the successful modern locksmith is the one who learns all they can about the security industry and is willing to grow and offer products outside of locks and keys. The locksmith who chooses not to adopt electronic forms of security will be out of business in the near future. Moving into video is a sure way to stay relevant.
John Nolan owns and operates Reliant Security in Grand Junction, Colorado. He can be reached at [email protected]. Join him on the Facebook group Locksmith Nation, where you can connect with other locksmiths from around the world: https://www.facebook.com/groups/LocksmithNation/
About the Author
John Nolan
John Nolan owns and operates Reliant Security in Grand Junction, Colorado. He can be reached at [email protected]. Join him on the Facebook group Locksmith Nation, where you can connect with other locksmiths from around the world: https://www.facebook.com/groups/LocksmithNation/


