When it comes to safe opening, there’s more to the job than just technique. In this article, I’ll try to cover all the bases of opening residential safes.
For a safe technician, the most important part of the job is to make sure you open the safe for the owner or legal guardian. Opening a safe for the wrong person easily could get you sued or thrown in jail and be a career-ender.
Before I accept any job, I have a thorough question process. A photo ID is required for any opening, and I like to get this in a text or email before I accept the job. This weeds out any questionable customers and jobs. Acceptable forms of identification include mail with an address, a passport or other government-issued ID.
I often ask what’s in the safe as well. The contents of the safe should match the given description, and it’s important for job considerations as I’ll note shortly. If I detect any red flags, I won’t do the job.
The phone conversation to collect information is where it all begins. I ask a lot of questions: When was the safe last opened? By whom? Has it been giving you trouble? How? Did you change batteries? Did you use a better brand of batteries? I also ask multiple people what the combination was. Do they all match? Can you think of anything that happened to the safe recently to cause the lockout? Was the safe recently moved? Did it fall?
I then walk the customer through the dialing process for a mechanical dial or keypad lock to ensure we have eliminated user error. After I have all the information I can extract over the phone, I’ll request pictures, a lot of pictures! I want pictures of the following: the entire safe, hinges, lock or dial, handle, serial number, front, back and sides. I’m looking for damage and notable characteristics to properly identify the container.
The Right Tools
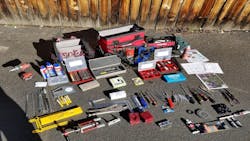
After we have a good customer who has no red flags and a good ID on the container, we can formulate a plan. Here’s a list of tools I use for my safe openings (Image 1):
- Knowledge via a safes database, yours or one that’s purchased
- Drill, corded or cordless
- Drill bits. Nearly all of the small home safes will be mild steel that can be drilled by using common HSS hardware store bits. But be prepared and have some safe bits as well. There are some sleepers out there.
- Scope, a hard scope or video scope
- Repair pins
- Wire probe
- Regular lock picks, HPC tubular lock pick, cruciform pick
A qualified locksmith or safe technician will NOT use the following tools unless there are extreme conditions, such as mechanical failure or a burglary attempt: hole saw, Sawzall, circular saw, pry bar or sledgehammer. Don’t destroy the customer’s property!
A tiny one-quarter-inch hole or less is all that’s necessary for a true professional, and that can be repaired easily. I can’t stand when techs pry or cut open containers because the customer said, “We don’t care what you do; just open it.” Any hack or handyman who has a pry bar or hole saw can open these safes, but it’s talentless and puts a huge blemish on the industry. Don’t contribute to the unprofessional tactics used because of a lack of knowledge or because it’s “easier.”
For Openers
Let’s discuss the common types of locking devices in most modern home safes and a few ways to defeated them:
- Solenoid lock: A small solenoid lock prevents the bolt work from passing.
- Mechanical body lock, normally three wheels: Wheels are shielded in the housing.
- Direct entry/straight tail wheel pack: The bolt work slides directly in a wheel pack.
- Motor-driven bolt work: no handle normally.
- Full-size electronic lock: full-size lock body and footprint.
- Full-size mechanical lock: full-size lock footprint.
This can happen by doing everything all at once or by applying light pressure on the handle and performing multiple impacts, repeatedly. By picking up the safe and dropping it, you shock the solenoid, which overpowers the return spring so the bolt work passes by.
Don’t worry about damaging the safe by using this method. I’ve never had a safe fail this way, but you should be more concerned about what’s inside the safe. If the contents are fragile or a gun is in the safe, I won’t use this method. That’s why it’s important to ask the owner what’s inside ahead of time.
A different approach is to put light pressure on the handle and slam the safe multiple times to gradually force the solenoid pin down. Both methods work well; it’s just personal preference. Keep in mind that most newer safes have corrected the issue, so safe bouncing won’t work all the time. This is where correct identification of the safe is key.
Other Methods
Now let’s look at opening a mechanical lock by using a practically undetectable three-sixteenths of an inch drill bit for direct entry under the label. No special drill bits are required; simple hardware store bits for metal work just fine.
You’ll want to have a scope of some kind. If you don’t have a borescope or medical-grade scope, which can be expensive, the little inspection cameras for your phone will work. I prefer the crisp, clear view of my 30-degree medical-grade scope. This also allows me to drill a much smaller hole that’s less detectable.
Start by carefully peeling back the paper label on the left-hand side of the safe. Then use your drill and bit, start at what would be 75 on the dial if you could see it, or the left side just outside the dial ring, and angle slightly in. (Image 5)

The best part of this safe-opening technique is you can fill the hole with a taper pin or steel stick and use a little glue to stick the label back in place. Only another professional will know you were ever there. Remember, it’s not always about the open. It’s how you leave the container that will determine how you’re remembered by the customer. Anyone can trash a steel box, but only a professional can open it and repair it so no one knows it ever was touched. (Image 7)
These are examples of openings for containers that most likely had lost combinations. Let’s look at something more challenging. In this case, I had a Sentry safe SFW205EVB and an emergency open. The owner put too much in the safe, and the safe was overstuffed with cash and coins, to the point where the bolt work bound up and made the handle strip out.
This type of opening can drive a tech crazy, because you have to spot clues to figure out the problem. There was absolutely NO movement in the door, so the owner got frustrated and stripped the handle as well. The lock worked after it was open, but it already was a lost cause. The customer had to open the store for business that day, and all the cash was in this fire container. By using a ratchet strap and hammer or block of wood, I released the pressure on the bolt work to open the container. At least no pry bars were used! (Image 8)
Fixing a Hole
Now that we have discussed a few different opens and types of locks with methods to defeat them, let’s talk about the repair after the opening has been completed. (Image 9) We already saw one example of how to repair a small home safe.

Take your taper pin and hammer the pin into the hole aggressively until it’s seated as far as it can go without denting or bending the container. Use a Dremel tool or grinder to cut that pin on one or both sides flush, depending on how deep it goes. Be mindful of the sparks produced so you don’t damage the customer’s property.
After the pin is cut, flush and ground flat, I like to use JB weld, steel stick epoxy or bondo to smooth out gaps. (Image 10) A good 80-grit or less sanding block can be used to blend the surfaces. Finally, a little touch-up paint will complete the repair. I keep several fingernail-polish-size containers of automotive paint, which range from black to white to touch up or to mix in some cases to best match the container. (Image 11)
It’s Business
Now that you have seen a few common (and some not so common) openings, let’s discuss pricing for your new professional skill set. If you provide professional work, then charge professional prices.
I charge a flat rate and add 50% for burglarized safes. My minimum safe open is $250, even if that consists of a simple battery change and user error. My rates vary but a rough ballpark:
- Home safe average $250+
- B rate safe $350+
- Gun safe $385+
- TL 15 safe $650+
- TL 30 safe $850+
- TL 30 X6 safe $1,200+
Knowledge and tools to sharpen your skill set are expensive and time-consuming. Do professional work and charge professional prices.

About the Author
Wayne Winton
Wayne Winton, CRL, AFDI, CAIis the owner of Tri-County Locksmith Services, located in Glenwood Springs, Colorado, and the president of the ALOA Security Professionals Association.