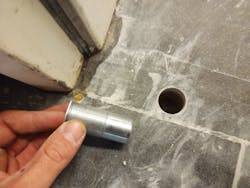
We’re going to be installing a multi-point high-security door receiver cup (Photo 1). This installation will involve drilling a pocket into the tile and probably through concrete underneath the tile.
In Photo 2, you can see the technician is laying out some tape – blue painter’s tape at the bottom of the door – which is the first step. Then we are going to take an O-ring puller or something sharp (Photo 3) and scratch an outline of where this pin directly impacts the ground in the fully seated, closed and locked position. Notice we’ll scratch on one side and then we’ll scratch a little bit on the other side, creating an outline so we know exactly where this pin lines up. (Photo 4)
The door alignment is absolutely crucial to this. Do not do any hinge adjustments or any adjustments after you make this mark.
Photo 4 shows what the circle looks like on the tape. Now that we have that circle outlined, we will use a diamond hole saw (Photo 5). Diamond is the only thing that’s going to work well on tile. I would highly recommend a hole saw paired with water as opposed to a carbine bit. A carbine bit can fracture or break the tile, especially when used in hammer drill mode.
The first thing we do is put some water down to lubricate and hydrate the bit. These bits are very fickle because they don’t have a center pilot bit. So we will start in at an angle (Photo 6). I rest the drill up against the frame of the door and begin holding and putting the angle on so we can cut into the tile. It should cut fairly rapidly if you use a new, sharp bit with good, high-quality diamond in it.
Once you get that angle and that first pocket drilled into it, you can straighten the drill and drill straight down (Photo 7), pulling that first plug out.
You may run into multiple layers of material. In this one, we ran through tile and then ran through concrete underneath that. That is fairly common. You could run into wood or other sub-floors.
Now we have the hole drilled out and it is deep enough for the receiving pocket that the pin will go into. I now use some SteelStik to go around the threads of the receiver itself. (Photo 8) This is easily mixed up and creates a nice, tight bond.
We then push the receiver into the hole (Photo 9) and trim away any excess epoxy. We have a perfect fit and this high-security door is ready to be fully functional.
For more video reviews, check out wayneslockshop.com.
Editor's note: Stay tuned for the full Securitech multi-point installation in our August issue.
About the Author
Wayne Winton
Wayne Winton is the owner of Tri-County Locksmith Services, located in Glenwood Springs, Colorado.
