Assignment: Remove a Corbin mortise handleset from an old existing door and reinstall the same lock into a new door. The Corbin lockset had been in the old door for over 40 years but the dull chrome finish did not show any signs of age (Photo 1). The owner liked the ornate handles and wanted the lock re-installed at any cost.
Mortise lock installations can be challenging but this job was a harder than normal. First, our shop is not called very often for new installations of mortise locks. Mortise cutouts for the mortise locksets we have installed were done by a time-consuming procedure of drilling separate holes in the edge of the door and removing barriers between the drilled holes with a wood chisel.
This new door had a fiberglass coating to protect the wood surface. The fiberglass extended 3/8" around the edge of the door from both the inside and outside surfaces. The result was that only one inch of wood was left on the edge of the door to mount the mortise lock face. Since the face was one inch wide, the edges of the lock face would be uncovered. Any miscalculation in hand-drilling the mortise cutout would also mean ruining the fiberglass coating.
Deep in a back corner of our shop was the answer to the problem. A man named Grumbach invented a mortise lock jig decades ago and our shop still owns one (Photo 2). The tool was found, cleaned up and proved to be a simple, fast and accurate solution for drilling a clean cutout for the mortise lock. A one-inch spade drill was chucked into an electric drill and six holes were made straight and true (Photo 3). Once the starting holes were drilled, a crank on the Grumbach tool was used to move the spade drill between holes and finish the cutout (Photo 4). The whole mortising procedure took about 15 minutes.
Coverings such as fiberglass can hide the quality of wood used beneath the surface and on the edge of the door. Wood material used inside the door was coarse and almost impossible to chisel cleanly. The next solution was clamp temporary guide boards to the door (Photo 5). A router then made quick work of making a smooth surface for the faceplate (Photo 6).
Once the machines had done their work, the rest of the job was plain cut and fit. Corbin did not do us any favors with the shape of their 1347 lock case. Small projections for the retainer screws, easy latch and face plate screws all required wood to be trimmed away a little at a time until the lock case finally slid into place. When working with only 3/8" of material on each side of the mortise, this careful trimming took two hours of time.
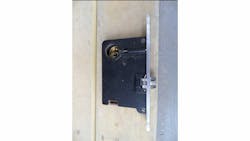
After the lock was fastened in place, installation of the handles and cylinder was a simple chore (Photo 7). Strike plate installation was the last step (Photo 8). While the edge of the faceplate is visible when the door is ajar, there was no alternative (Photo 9). This 40-year old Corbin handleset still provides a modern, up-to-date addition to the refurbished front entrance (Photo 10).
About the Author
