When I began locksmithing in the late ’70s, I wasn’t taught to use jigs. I’d use the paper templates that came with the hardware and hope I didn’t drill all the way through a wooden door and wind up splintering the other side. When drilling a metal door without a jig, it was all I could do to not let the hole saw go wild and scratch the door.
Through the use of jigs, installations would be much less dangerous for someone like me who didn’t grow up in a house full of tools and knowledge about using them. These days there’s a jig or other installation tool for just about every job imaginable.
Rob Neville is a lock technician who works for Haddon Locksmith in Oaklyn, New Jersey. Locksmith Ledger spoke with Neville about the use of jigs, templates and mortising tools while on the job, and he shed light on life with and without the use of such aides while installing lock and door hardware.
Locksmith Ledger: How did you begin your career as a locksmith? Were you pretty handy before you started?
Rob Neville: I began in February 1997. I didn’t know I was handy but picked it up pretty quickly. I was in a co-op program in high school, and I started out with a landscaping job before being laid off. I was told they could get me a job with a locksmith, and my response was “what the heck is a locksmith?” As long as I’m getting paid, I’ll give it a shot.
LL: So, you went to work instead of school?
Neville: I went to school until 11:30 and worked part time in the afternoon. I started off in the shop, where most beginners do. I worked full time over the summer, and senior year was the same. As soon as I graduated, they offered me a full-time position.
LL: So, like most apprentices, you started in the shop learning the keyboard, cutting keys and helping customers?
Neville: Yes. I did all of that and prepping things for the road guys. I went out with a [technician] to do residential, auto and commercial jobs.
LL: Was the technician using jigs or templates to do installations back then? How were you taught?
Neville: If it were a brand-new installation, I used a square and a pencil. If there was an existing knob on the door and I was installing a deadbolt, I’d measure the backset of the existing knob and then go 5-1/2 inches up from the center of the knob. This was in case sometime in the future they decided to go with a one-piece handleset, for example. You’d mark the inside and outside of the face of the door and pilot the bit one-eighth of an inch into the door and do the same from the edge. Then, use a hole saw to go halfway through one side and do the same from the other side to complete the hole.
LL: So, you didn’t have to have many tools for that. It sounds like you’re an advocate of using the square.
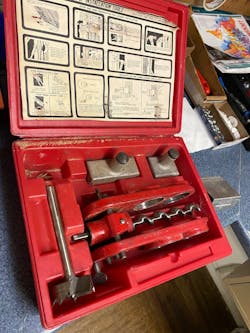
Neville: Correct. At that time, there was a lot of Dexter sold in the area, and in most cases, a 1-5/8-inch hole was used, so we’d have to enlarge the hole to accommodate most other locks, up to 2-1/8 inches. If it was a wood door, I’d use a brace and auger, and I absolutely loved the kit we used for that. It was a little messy but easier to clean up after than a regular hole saw, because the pieces of wood were bigger. If it were a steel door, I’d nest the hole saws. You put one inside the other. The smaller one was your guide, and the larger one cut the new hole. (Image 2)
LL: I learned to do everything more or less freehand, and I don’t remember ruining many doors. Do you remember learning what not to do from experience?
Neville: I was with [another technician], getting ready to drill a metal door. Before I started, he told me to stand a certain way and lock my elbows in case it bites and skips all over the door and takes you with it, and that’s exactly what happened. It skipped across the door and twisted my arms around to where I couldn’t even let go of the trigger! He had to come grab the drill and bail me out.
LL: How much more prepared would you be today in that same exact scenario?
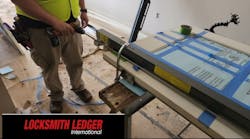
Neville: First, I’d make sure the hole saw is sharp. I’d go more slowly and angle the hole saw slightly, so it starts to take away metal on one side and gradually straighten out and go through. A jig would make it easier, like the Kwikset one. (Images 3 and 4) No measuring is needed; just clamp it on the door and go to town. Getting it started correctly is the key.
LL: Do you ever use the paper template that comes with levers, deadbolts, etc?
Neville: I don’t. They’re made of paper and add a step that’s unnecessary when you’re taught the proper way. I use this blue template when replacing a knob with a commercial lever, because you have to drill holes for the through bolts. (Image 5) This one isn’t quite accurate for BEST levers but is for most others.
LL: Do you use anything special to mortise out the strike and edge of the door?
Neville: This one you just fit into the 1-inch hole and mark it and chisel out the wood. (Images 6 and 7)
LL: Do you have tools to help with door closer installations?
Neville: In most cases, I read the instructions and measure and mark accordingly. A tape, square and a pencil do the trick. If a closer comes with a self-adhesive template, like the LCN 4040 smoothie, then I’ll use it by punching the holes and drilling from there. If it’s a standard Norton type closer with that standard footprint, then I use the instructions and measure accordingly. Measure twice and drill once.
LL: How about exit devices? Are there any installation aides you’re aware of?
Neville: If it comes with a template, I’ll tape it to the door. I think the Von Duprin 99 device comes with a plastic template; you just mark it up to the strike. Actually, I think you’re supposed to install the strike first, and then put the template up to the strike and then mark and drill for the through bolts.
LL: How about when you have to do a fresh install of an Adams Rite-type lock on an aluminum storefront door?
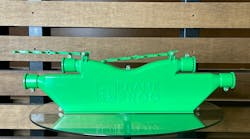
Neville: For that, we have the router and jig. (Image 8) This one is for a 1-1/8-inch backset, and there are adapters to change the backset, like thirty-one-thirty-seconds of an inch, for example. I’ll do this maybe three times per year. Sometimes you have to move an existing lock to accommodate other hardware being added. This kit also includes what you’d need to freshly install many electric strikes.
LL: Do you remember installing electric strikes without the use of such tools?
Neville: I’ve probably done most of them without the jig, because the faceplate cutout is already done, and then you just cut in for the actual strike body. I prefer using the jig, but the application doesn’t always allow you to. I just did one last week where I couldn’t properly get to the strike body part, because there was stucco sticking out, and I was prevented from fitting it on properly. The jig helped get me in the right spot, and I just had to finish it off by hand.
LL: It’s typically much easier to replace what’s there than do a fresh install. Do you allow for the “what ifs” that can happen?
Neville: In the case I brought up, we had to alter 43 out of 50 doors so they’d align correctly. It adds an additional 20 minutes per door, and that’s lots of time. For a reason like this, it’s beneficial to have the right tools for the job.
LL: Do you do fresh mortise lock installations?
Neville: I did a fresh pocket door lock install by hand, and it was time-consuming. If I had hair, I’d be pulling it out. After completing the job, Jim [Haddon, the owner] tells me, “we have a jig for it.” I didn’t know we had it, and we agreed I’d gladly use it next time.
LL: How would you go about training someone initially when it comes to fresh installations? Use whatever jigs and templates that are available, or do it by hand at first?
Neville: I’d like them to begin installing by hand at first. I got used to doing it the old-fashioned way. The jigs can be somewhat quicker and easier and require less thought. I like to stay away from using them sometimes, because I don’t want to possibly mark the door after squeezing the jig on too tight.
LL: It seems like there will be a tool, jig, template, etc. for almost all of the situations encountered by the locksmith. Have you ever been in a situation where you goofed and had to replace a door?
Neville: Fortunately, not. I’ve had scar-plate goofs that no installation tool would have helped me to avoid, more of a slip of the hand. Most of my goofs have involved metal doors and a runaway hole saw. If I had used the Kwikset tool we looked at earlier, I would’ve avoided that scenario.
If you’re pressed for time, then use the jig. It might take a little bit [of time] to get it and clamp it on properly, but you’ll be glad you did in the long run, because fixing a mistake can take way too long.
Steve Kaufman has worked for distributors in the locksmith industry since 1993 and worked as a full-time locksmith from 1978 through the 1980s. Kaufman is the sales manager for IDN Hardware out of its Philadelphia location.


