This job involves converting storefront doors to a double-door hardwired electronic access control with a Locknetics magnetic locking system. Photo 1 is the before view of the doors.
The first step is to tape up the template (Photo 2) so that you get your holes drilled in the correct locations for both the header and the door itself. (Photo 3)
Photo 4 shows our little cart loaded with the tools we’ll need today. I love using these little carts because I can easily access all the tools, screws and other items needed to install this electromagnetic lock.
We used the supplied Allen head wrench to loosen all of the Allen head screws that are attached to the connecting plate. (Photo 5) This connecting plate (Photo 6) slides in and interlocks with the mag lock after it has been installed on the frame.
On the frame, we had to remove the door stop for this top area (Photo 7). This is a thin piece of metal that protrudes down to stop the door.
In Photo 8, we use our angle grinder to cut that particular piece out. This is sometimes avoided by using a spacer. However, we could not use the spacer in this particular application.
Make sure that you repaint that area so that it looks nice when you're done. You don't want to leave a bunch of cut or scarred metal when you leave the jobsite. You want to make sure that it looks clean and professional. Photo 9 shows the plate in its mounting position, the spot where that door stop was removed.
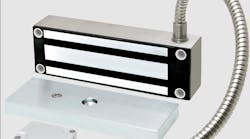
Now we're going to start assembling and installing the door magnetic pads. (Photo 10) These are solid pieces of metal that go on the door. In photo 11, you can see that the magnetic lock has been attached to the mounting base plate and installed properly.
We mounted the door maglock plates to each one of the doors. Photo 12 shows what it looks like from the outside – a round large carriage Bolt is all that’s visible from the outside.
Again we have that mounting plate (Photo 13). Start off by mounting the first two screws in the oval slots so that you can slide and adjust that plate in place after it is lined up properly. You can then tighten it down and screw it to its permanent location.
Photo 14 shows the touch-sense exit devices that needed to be mounted between 36 and 48 inches on the door. I use a couple pieces of tape to hold the exit devices while we make our measurements. Those lines are drawn on the tape so we do not draw on the door directly. Then we use a quarter by 20 drill tap to drill the door so that we can install those mounting screws (Photo 15).
You can use rivnuts if they are supplied. This door was extra thick so we determined that the door being tapped and threaded itself would be enough to hold this particular touch-sense exit device. You can see what those screws look like go into the door right there. (Photo 16)
In Photo 17, John Nolan with Reliance Security is dealing with all the spaghetti that's coming out of the ceiling with all the wiring and getting the wire from the power supply, which is mounted in the ceiling up above those ceiling tiles. (Photo 18). This is called the can or the power supply. Those wires then drop down and power the magnetic locking system and the touch sense bar so that everything can operate together. We're going to be incorporating our door operator with this as well so we've got electronic access everywhere.
Now we need to delete or cover holes from the original Alarm Lock unit that was installed here. We start off by using the GKL Products bridges (Photo 19), which slide right into place and cover plates (Photo 20) that cover the mortise hole on each side. There's a little piece of all thread and you use this little key and it and covers up that hole in a very nice, sleek looking system.
For covering up additional holes in the door, we're going to use some nutserts or blind nuts. I like this little kit that uses an impact driver to set them (Photo 21).
Now we're remounting the handles. The hole up above this handle (Photo 22) was too large for our rivnuts or our nutserts. Once the hole is too large, we cannot shrink it, so using a sticker or some other kind of cover will take care of that. Having metal stickers (Photo 23) is extremely vital to cleaning up the door and covering up any unwanted holes or any unsightly portions of the project.
We've got all the wires tucked away now, everything is ran inside the doors and over to the magnetic locking system and we’re tidying everything up. (Photo 24)
Two large batteries in the power supply will provide backup power in case power goes out in the building.
Photo 25 shows our completed installation from the outside, all nicely cleaned up. An Alarm Lock PDK 3000 keypad is mounted on the side over by the stucco.
Photo 26 shows the completed opening from the inside. Here's what the door looks like from the inside. (Photo 26) We’ve mounted the magnetic locking system up above two power loops and those touch-sense exit devices.
For more information, check out Wayne’slockshop.com and lockreference.com.
Wayne Winton is the owner of Tri-County Locksmith Services, located in Glenwood Springs, Colorado.