I’d like to take a moment to thank the engineers who developed the lock system that Honda and Acura vehicles now use. That lock system alone has brought more work to me and other locksmiths than any other lock system that I can think of, with the possible exception of the Alphatech locks used by GM many years ago. But unlike GM, Honda has gone across the board with their lock system, and has made it standard equipment on all of their vehicles since 2003, and they continue to use it today.
The Problem
In all seriousness, the Honda side-milled lock system has become one of the staples of the automotive locksmith, due to questionable design and the belief by many Americans that WD-40 can fix anything. The system uses twice the number of moving parts as most lock systems, crammed into the same space. All of those tiny parts have to work together in absolute precision for the lock to function normally. Since the tumblers themselves are made from a harder material than the matrix that contains and supports them, proper lubrication is essential to the continued functioning of the lock, which is why the locks come from the factory packed with grease.
Unfortunately, in daily use, that grease gets carried away by the keys a little at a time and the remaining grease traps dirt and pocket debris that gets carried into the lock by the greasy keys. Eventually the locks will start to malfunction, and rather than cleaning the lock and replacing the grease, most users will shoot the lock full of WD-40 or some other aerosol solvent/lubricant that washes out much of the remaining grease.
Then, without proper lubrication, the relatively harder tumblers begin to wear away the surrounding cast zinc matrix of the lock plug, which allows the tumblers to wallow out larger and larger chambers for themselves. This cycle then repeats until one or more of the tumblers jam to the point that the lock no longer functions. This normally happens suddenly, but may be relieved temporarily by the application of more solvent which will eventually only make the situation worse.
Because we live in an age where keyless remotes are used to unlock doors more often than keys, it is often the ignition lock that fails first. It’s not unusual to arrive on a job to find a Honda or Acura automobile with a jammed ignition lock as well as a door and/or trunk lock that is also jammed.
The Temporary Solution
Because the problem with this lock system is a design issue, it’s impossible to permanently “fix” the problem. The best that you can do is to replace the lock with a brand new lock and hope that it lasts longer than the rest of the vehicle. It is possible to replace just the lock plug and the tumblers on the door and trunk locks, but as far as I know, there are no replacement lock plugs available for the ignition locks. In order to properly “fix” a jammed ignition lock, you will have to replace the entire ignition lock assembly.
Honda has acknowledged the problem in a “Technical Service Bulletin” (TSB) published in 2004. (Honda Service Bulletin 03-068 published 10/29/2004) In addition, they have made available a service kit for doors and tailgates (Honda P/N 06720-S5A-305, H/C 7604499) that contains tumblers, springs, E-clips, and replacement lock plugs (2 for tailgates and 8 for doors). With this kit, you can repair most of the non-ignition lock problems that you will encounter. But that still leaves the problem of failed ignition locks.
When the ignition lock fails, it almost always fails suddenly and completely, leaving the owner stranded. Last summer, I had a call to repair a Honda Odyssey that had failed at a local school. The owner had just dropped off the kids at the school and was starting to pull out of the busy drop-off area when a child ran back to the car for something they had forgotten. The parent stopped the van, half in and half out of the drop-off lane – partially blocking traffic – and shut the engine off to let the kid retrieve the forgotten item. When the driver tried to re-start the vehicle, the key simply would not turn. The car sat there for several hours until I could arrive and solve the problem.
In the case of the ignition locks, you only have two options. You will either have to replace the entire ignition lock, or disassemble the old one and “treat the symptoms.” Most often the customers in my area balk at the price of the new ignition lock since this usually happens on older, high mileage vehicles. If you “treat the symptoms,” make sure that your customer understands that the repair is temporary, and that the lock could fail again. Otherwise, you may be getting an irate phone call in a few months or years later. I always write a short note on the receipt and have the customer sign it, stating that the repair is NOT guaranteed indefinitely, and that the lock WILL fail again in continued use.
By “treat the symptoms,” I mean disassemble the lock, locate the jammed tumbler(s) and remove them and their springs. Because these locks have split tumblers in all positions, you will normally be removing tumblers in pairs. Since there are normally 12 tumblers in the lock to begin with, that normally won’t compromise the lock or allow the key to pull out in the turned position. But, if the lock has been worked on before, you simply may not have enough left to work with.
The real problem with servicing Honda ignition locks is the amount of labor required to remove and replace the lock. It is sometimes possible to remove the lock cylinder from the lock housing without removing the housing from the steering column. However, it is usually easier and quicker to simply remove the entire housing rather than to fight with the roll-pin retainer that secures the lock cylinder while the lock is on the steering column.
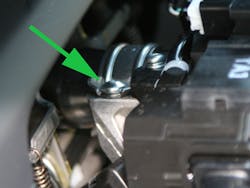
As on most Japanese vehicles, the Honda ignition lock is held in place with shear-head bolts that break off when they are installed, leaving a headless bolt (Photo 1). I normally use a hardened punch with a sharp point to loosen these screws. By tapping on the outside edge of what remains of the bolt head, I can usually loosen the bolt enough to remove it with pliers or my fingers. There are normally two of these bolts, but you will often have to remove a lot of stuff in order to get to them. Fortunately, the Honda and Acura steering column shrouds are not difficult to remove and there are no hidden screws that require you to turn the steering wheel.
The transceiver ring and the lighted ring from around the face of the ignition lock will have to be removed (Photo 2). Several small Philips-head screws are used to secure the transceiver ring, but one of the screws is located at the rear of the lock where it is very difficult to remove. Loosening the lock housing from the column by removing the shear-head bolts will usually give you access to that screw, but it will still be difficult. I have done several vehicles where this screw was missing, which told me that someone else had already been there and decided not to replace that troublesome screw.
That kind of thing can be a mixed blessing, because it also means that some of the tumblers may already have been removed from the lock. I got into a Honda Pilot at the auction once that only had four tumblers left when I took it apart, and two of the remaining tumblers needed to be removed. The dealer found a used lock at a junkyard and I wound up using it as a replacement. The dealer didn’t care that the vehicle now required two keys, but that’s to be expected in auction work.
Removing the Lock Cylinder
To remove the lock cylinder from the lock housing, you will need to remove the single roll-pin that secures the lock into the housing. As I’ve mentioned above, this job is much more easily accomplished with the lock removed from the car. But, in some cases you may want to do the job with the lock still in place. To illustrate that, I shot these photos of a 2004 Honda Civic where the lock had failed in such a way that it trapped the key in the ignition. I was unable to remove the key without risk of even more damage to the lock, so I cut the head of the key off with a cut-off wheel on my Dremel™ tool, so that I could remove the steering column shroud.
Photo 3 shows the ignition lock with the shroud removed along with the transceiver ring assembly. The opening in the side of the lock, indicated by the arrow, is the location of the tiny roll-pin that secures the cylinder into the lock housing. This roll-pin is recessed into the opening, but protrudes slightly above the bottom of the hole. The good news is that the roll-pin is not normally held in very tight, but the bad news is that it is almost impossible to grab. In some cases, I have been able to remove the roll-pin easily with a spiral-type key extractor. By inserting the key extractor into the roll-pin and then pulling down and out on the key extractor it is sometimes possible to pull the roll-pin out. I always try that first, because when it works, it works quickly, especially if the lock has been serviced before. (On one occasion, the roll-pin fell out of the lock as soon as I removed the transceiver ring. Apparently the previous technician had barely put it back into place, perhaps fearing that he may have to work on that lock again.)
There are basically two styles of these Honda ignition locks. This style is referred to as a “Type-1” ignition. From our point of view, the primary difference between a “Type-1” ignition and a “Type-2” ignition is that the roll-pin is on the front side of the housing on the Type-1 locks and it is on the rear side on the Type-2 locks. Getting to the roll-pin on the Type-2 locks is extremely difficult when the lock is still attached to the steering column. It’s much easier to remove the Type-2 locks from the steering column. (Our chart lists the different Honda and Acura vehicles equipped the Type-1 and Type -2 ignitions.)
I was unable to remove the roll-pin on this 2004 Civic with a key extractor, so it was time for a “Plan-B.” Photo 4 shows my well used “Honda & Acura Ignition Roll-Pin Removal Kit” (P/N: IRPRK) from Lock Tech. When properly used, this kit allows you to remove the roll-pin relatively easily. I want to emphasize the “when properly used” part of that description. There is a definite learning curve associated with this tool. Hands-on practice is the only way to get good results with this tool. But if you read and follow the instructions carefully, you will soon get a “feel” for using the tool. If you plan on buying one of these tools, I strongly suggest buying a “Refill Kit” (P/N: IRPRF) at the same time (Photo 5). The tool itself comes with 10 sets of the components that you will use to remove the roll-pin, which in theory will allow you to service 10 ignitions. In practice, I average using two sets per lock, and the first time I used the tool, I think I went through four sets before I got the roll-pin out.
I won’t attempt to give you all of the operating instructions for the kit, because you really need to read the complete instructions to use it properly. Below are the basic operating principals as I used it on this 2004 Civic.
Photo 6 shows the Type-1 fixture mounted onto the ignition lock. The word “Black” stamped on the fixture tells you to use the black thumb-screw in that position; the word “Red” is stamped on the other side of the fixture where you will need to use the red thumb-screw. These screws go into the same screw-holes that were used to attach the transceiver ring assembly to the lock housing. Before I attached the fixture, I used the scratch awl with the angled tip (Photo 7) inserted into the roll-pin to rock the pin from side to side in an attempt to loosen the pin slightly, and center it in the hole. This important step is often overlooked by those who skim through the instructions. Loosening the pin will make the whole job go a lot smoother.
Once the roll-pin has been loosened, and the fixture is properly installed, you are ready to remove the roll-pin. Three components of the kit will be used: the ¼ X 20 brass thumb-screw, one short extraction tube and one long extraction tube (Photo 8). First insert the short extraction tube into the hole in the brass ¼ X 20 thumbscrew, and then gently tighten the set screw just enough to hold the short tube in place. Next, insert the long extraction tube into the short one so that the flared end of the long tube extends out from the threaded end of the brass thumbscrew (Photo 9).
Next, insert the entire assembly into the threaded hole in the side of the fixture over the roll-pin. As you insert the tool, make sure that the flared end of the long tube fits over the exposed end of the roll-pin. Once you are sure that the long tube is seated properly on the roll-pin, thread the entire assembly into the fixture, but only tighten it one or two full rotations of the thumbscrew. Lightly tap the exposed end of the long tube so that it is firmly seated onto the roll-pin.
Finally, tighten the thumbscrew until it comes to a definite stop, but DON’T over-tighten it. This will force the short extraction tube over the flared end of the long tube, effectively clamping the assembly onto the top of the roll-pin. Using the supplied wrench, tighten the set-screw one full turn ONLY and then loosen the black thumbscrew that secures the fixture. At this point, you should be able to unscrew the brass thumbscrew, which will pull the roll-pin out of the lock housing and release the lock cylinder. Once removed, you will see the roll-pin firmly clamped into the end of the long extraction tube.
Don’t be surprised if this doesn’t work the first time. Using this tool will require some practice and each set of extraction tubes can only be used once. But with a little practice, and attention to the details, this tool will pay for itself in short order.
After the roll-pin has been removed, the only thing holding the lock cylinder into the housing will be the fixture. There is a spring at the rear of the cylinder that will try to push the lock out of the housing, so be prepared as you remove the fixture for the lock to “jump” out of the housing. Make sure that you don’t lose the spring.
With the lock cylinder free, all you have to do now is disassemble it and remove the tumblers that have jammed in order to temporally solve the problem. The plug is held in place by a timing ring that slips over the end of the tail-shaft. The timing ring is secured by a roll-pin that passes through the tail-shaft. With the timing ring removed, the plug should slide cleanly out of the housing.
I hate doing “repairs” where I don’t actually solve the problem, but in the case of these ignition locks, the only other option is to completely replace the lock. Many customers feel that the cost of the replacement lock is simply more than they can afford, so this is the only alternative. Make sure that your customers understand that the repair is only temporary, or this kind of job can come back to bite you on the backside very easily.


