2016 has been an interesting year in the automotive locksmith field. For me personally, it was the third year since I jumped back into full-time work running my own automotive locksmith business. The business seems to be well established now and I’m working on expanding the services that I offer whenever possible. Below are three different things that I have done in the last year in an attempt to make my business more productive.
Xhorse Condor XC Mini Machine
With high security side-milled keys being used by both Ford and GM, I found myself both duplicating and originating more side-milled keys than ever before. My manual machine has served me well over the years, but as the volume of keys that I cut was growing, I realized that it was time to upgrade to a computerized machine. I spent a lot of time talking with people that I knew in the industry, whose opinions I value. In the end, I chose the Condor XC Mini machine from Xhorse. (Photo 1)
Naturally, price was a big consideration, since I am still essentially operating on a shoestring budget, but I also know the folly of purchasing cheap tools. At first I was reluctant to go with a Chinese machine, but as I talked to colleagues who actually owned one, or in one case several, I slowly came around. The three-year warranty was what finally cinched the deal for me.
Once I got my machine, I immediately put it through its paces to see if I had made the correct decision. Four months later, I’m happy to recommend the machine and it keeps amazing me with what it can do, and how effortlessly it does it. Sure, I’ve had some problems using the machine, and I’ll cover those shortly, but in the long-run, I’m very happy with my choice.
If you are unfamiliar with the Condor XC Mini, let me run through its basic specifications. First, the Condor XC Mini is a second generation machine, with the original Condor machine being the first generation. The original Condor was a larger machine and is no longer in production. I really have no personal experience with that machine, so I really can’t comment on it other than to say that the second generation machine, the Condor XC Mini, seems to be a very refined piece of technology that must have benefitted from the company’s experience with the first generation machine.
The Condor XC Mini is a totally computer driven machine, essentially a robotic key machine. There is no way to use the machine in a “manual” mode. If the specs for a particular key are not in the software, you won’t be able to use the machine on that system, even to duplicate a key.
The machine is controlled by a touchscreen computer built into the top of the machine. (Photo 2) Most of the functions are pretty intuitive, but you will need to study the literature provided with the machine to load updated software and to customize the software. The Condor XC Mini has a USB “Type-B” port on the rear of the machine that can be connected to any computer with a USB port. (Photo 3) On my Windows 10 computer, the update process was quick and simple. All I had to do was connect the machine to the computer, access the Xhorse website and click the “Update” icon.
The basic Condor XC Mini package includes a starter set of cutters and guides and two vises. A third vise especially for Tibbe keys is available, but not included in the standard package. The “M2” vise used for side-milled keys has four different sides and rotates smoothly on its support so that you can change from one gripping choice to another quickly. (Photo 4) The four different gripping choices are lettered A, B, C, and D, and the touchscreen display will show you which choice is required when you input the key information as well as which alignment mark to use when clamping the key. The “M1” vise for edge-cut keys only has one gripping choice, but it seems to work well in most cases. (Photo 5)
I did not buy the machine for edge-cut keys, but I have found myself using it for that more often that I originally thought I would. I particularly like the way it cuts those hard to hold keyways such as the GM Z-Keyway and the Nissan DA34 / X237 keyway. The vises are held in place on the machine carriage with a clever dove-tail fitting that locks down with a quick twist of a thumb-lever. (Photo 6) Changing the vise takes only a couple of seconds, but you need to make sure that there are no metal chips on the rails before you insert the new vise.
When you first get the machine, the instructions will walk you through the process of calibrating the machine for both of the vises and whichever cutter and guide you choose to use. Whenever you change to a new cutter / guide, you will also have to run through the same calibration steps again, but after doing it once, the procedure is fairly quick and simple.
As an example, I’m going to run through the procedure for duplicating a Honda side milled key and originating a GM Z-Keyway key from code. To begin with the Honda key, I first select key duplication from the main menu. (Photo 7) I am then presented with an alphanumeric keypad on the touch screen where I will need to enter the type of key that I will be duplicating. (Photo 8) After choosing “Honda,” I am then presented with a list of models, many of which are not sold in North America. (Photo 9) On this screen I can enter the name by way of the keypad, or use the arrow keys to scroll to the desired vehicle. I normally use a combination of the two choices, by entering the first few characters of the name to narrow down the choices and then choose the correct model by touching the screen. Once the model has been selected, you will be presented with a choice of year ranges and generations of the model you chose. (Photo 10) When you have made your selection, you will be shown the correct vise, gripping choice, and alignment mark to use for the key. (Photo 11)
When you have the key properly clamped in the machine, you will need to select “Decode Key.” But before you start the actual decoding, you are given the opportunity select options for decoding badly worn keys. (Photo 12) Once you have confirmed your choice, the machine will begin decoding the key. First, the machine checks its own calibration and the correct placement of the key. If there is a problem with either, the machine will stop and give you an error message so you can correct the problem. If there are no problems, the machine will move the guide to gently touch each cut on the key and decode it. (Photo 13) The results are displayed on the screen when it is finished and then you can insert the key blank.
After you have the key blank in position, the machine once again checks the calibration and placement of the key before it starts cutting. If everything is correct, it will begin cutting the key. The machine generally makes two passes down each side of the key until it is completely cut. The carriage of the machine then returns to the neutral position so you can flip the blank over and cut the second side. Additional duplicates can be made by simply inserting another blank and pressing the “Cut Key” option until you have as many keys as you desire. The cutting information is also saved to the machine’s memory so additional keys can be cut at a later date if needed.
To originate a key, in this case a GM Z-Keyway key for a Chevrolet Silverado with a code of G1278, you’ll need to select the “Key Database” icon from the main menu. (Photo 15) Once again, you will be prompted to enter the manufacturer of the vehicle, (Photo 16) but then you will be presented with a screen to enter the key code. (Photo 17) After entering the code, the screen will display the correct vise to use, in this case the “M1” vise, and the alignment mark to use. (Photo 18) Once the key is properly clamped in place, the machine will once again check the calibration and placement of the key and alert you if there are any problems.
If everything is ok, the machine will begin cutting the key. (Photo 19) It will once again make two passes down each side to complete the cutting. Additional keys can also be cut by simply inserting a new key blank and pressing the “Cut Key” icon. I have found that because the key is clamped near the bow of the key, it will sometimes slip in the vise, causing the tip of the key to rise above the proper position as it is being cut. For that reason, I generally hold the head of the key with my finger as it is being cut to prevent the blank from tipping up.
As I mentioned earlier, if the specifications for the key are not in the machine, you will not be able to cut the key. But a “Customization” menu will allow you to add systems manually that are not in the menu. This menu is accessed by way of your computer, and the hook-up is the same as for updating the software. In the customization menu, you will be prompted to name the system that you want to add and enter the cutting specifications. The cutting information can usually be obtained from your code software, but in most case that information will be given in thousands of an inch. The Condor XC Mini will require you to convert the information from inches to metric, which was the only real problem I had in entering the information. Fortunately there are many inch to metric converters available on the internet. I hope that the software designers will come up with an option to input inch measurements in a future update.
About the only other problem that I had with the machine was when I tried manually entering the cuts for a known system when the system did not have the code. I initially entered the information in the U.S. standard where the number one cut is the shallowest cut in the system. This produced a key that was exactly backwards of what I wanted. So when entering cuts manually, especially for Japanese and Korean vehicles, be sure to use the Asian standards where the number one cut is the deepest cut in the system.
Keyline Micro Series Transponders
The Micro Series of rewritable transponders from Keyline (formerly Bianchi) currently consists of three different transponders: the GKM, GK100 and the GK50. The GKM and the GK100 are both glass encapsulated transponders, (Photo 20) while the GK50 is a carbon chip (Photo 21). The GKM will allow you to clone keys equipped with the Megamos® Crypto (ID48) and Megamos® fixed code transponders. The GK100 can be used to clone keys equipped with the Philips® Crypto (ID46), Texas® Crypto (4D) and Texas® Fixed code (4C) transponders. The GK50 can be used for cloning keys equipped with the first generation Philips® Crypto transponders (PH1B, PH1C, PH1D, & PH1E). Keyline offers an extensive line of “Pod Keys” that perfectly fit the Micro Series transponders so you can produce a good looking clone key for these sophisticated systems quickly and easily.
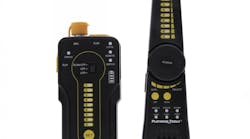
One of the more irritating things for me as I built my new business was that I was all but locked out of the VW, Audi, and Porsche markets. But thanks to the new Micro Series transponders from Keyline, and my 884 Decryptor, (Photo 22) I am now able to produce duplicate keys for those vehicles at a very competitive price. When I first learned of the GKM glass encapsulated transponders for the VW / Audi Group, (VAG) I was excited because I had recently dealt with a series of vehicles that I either struggled with or had to turn down. Now, I can use a pod key to produce a VAG clone key, or I can buy the relatively inexpensive VW flip-keys and then swap out the included transponder for a GKM transponder and easily clone VW switchblade keys.
The TKM Extreme software update that was needed for my 884 Decryptor to be able to use the new transponders was easy to install and came on a TK100 electronic head that I could then use as a normal clone key. The only problem that I had with the software installation was that I had apparently failed to update my machine for a while and I was informed that before I could install the TKM Extreme software, I would have to update my operating software to the most recent version. After the update process was finished, installing the TKM Extreme software went very fast.
In order to use the TKM Extreme features, you must be connected to the Keyline website via the internet, so at first I thought I would only be able to use the system at my shop. However, I recently discovered that Verizon offers a mobile hotspot that plugs into my vehicle’s OBD II port, and I can now use the system anywhere I have an adequate phone signal. Many people also use the system with a tablet that has a cellular internet connection in place of a laptop, but I’m still using a laptop for now.
The first vehicle that I used the system on was a 2004 Audi TT. The process went very well and I had a working key in short order. It actually took longer to program the remote than it did to make the cloned key. (I eventually found an on-board programming procedure online that allowed me to program the remote.) Since then, I’ve done several VWs and each one has gone well. The basic procedure is outlined below.
Begin by logging in to the Keyline website and connecting either the 884 Decryptor Ultegra or the 884 Decryptor Mini. Once you are connected, you insert the original key into the cloner until you are prompted to insert the key with the GKM transponder. Once the GKM has been prepared for the “Sniffs,” you will take the GKM key to the car and sniff it four times. Each sniff consists of inserting the key into the ignition and turning it on for at least 5 seconds, (I give it 10 seconds) then turning the ignition off and removing the key. I normally wait at least 5 seconds between sniffs. Take your time with this step; if you get in a hurry here, you will only make the job harder than it needs to be.
During the sniffing process, the GKM records information from the vehicle’s attempts to communicate with the transponder. This information will be processed when you bring the GKM key back to the cloner and added to the information from the original key in order to determine the encryption algorithm needed to produce a working key. If everything works correctly, the next step should produce a working key.
When you return the GKM key to the cloner, it will check the sniffs and then begin the calculations necessary to produce the clone key. (If the sniffs were not done correctly, or the sniffs did not get enough data, you may be prompted to repeat the sniff procedure.) The calculation phase may take up to 10 minutes, so be prepared. If the system is too busy at the time you attempt to run the calculation, you may be put into a “queue” and given an estimated time until the calculations will be done. There are procedures for you to use your cloner for other jobs while you are waiting for the calculations to be completed and even procedures for you to be alerted by email when the calculations are finished. So far, I have never been placed in the queue, and have always been able to get the key done in 10 minutes or less. The other members of the Micro Series allow you to do basically the same for other sophisticated systems.
Transponder Island
Transponder Island is one of the very few places that can supply locksmiths with keys, remotes, fobs and programming for a variety high end vehicles such as BMW, Volvo, Jaguar, and Land Rover. As I mentioned earlier, I hate telling a customer that I can’t do something. It irritates me to have to send customers to the dealership. With the help of Transponder Island, I can now capture some of those sales that I previously sent to the dealer.
I personally have decided that I’m not going to jump into the EEPROM market at this time, but for those of us who do work in that line Transponder Island also provides a lot of tools, equipment and education for EEPROM work.
One of the reasons I’m not doing EEPROM work is that I’m hoping to retire from active locksmith work in a couple of years. In my opinion EEPROM work is a young man’s game; if I were 20 years younger, I’d be on it like white on rice. In addition to that, my market here on the “Redneck Rivera” (Florida Gulf Coast) is more oriented to domestic vehicles than to the high end imports.
One of the main things that I love about Transponder Island is the ability to purchase OEM Volvo keys, fobs and remotes. Of course until recently, I couldn’t use any of those items because I couldn’t program the vehicles. But now, with the tools and education that Transponder Island has brought to the market, I can program OEM Volvo keys just like the dealer does. As far as the programming goes, all I had to invest in was a “J2534 Pass-Through” device and the keys themselves. I don’t even need to be a member of NASTAF if I’m willing to generate my keys from scratch.
Transponder Island even stocks Fiat keys and remotes, and supports you as you work to program them. With the increasing number of Fiats on the streets, as well as a number of Fiat derived Chrysler vehicles, such as the Jeep Renegade and Chrysler 200, this is becoming more important every day.
I also like the fact that that Transponder Island has several entire seminars posted on their website. I recently watched one on BMW EWS programming and one on the Volvo system. I’ve always believed that a distributor should support the products they sell, and Transponder Island is doing just that.