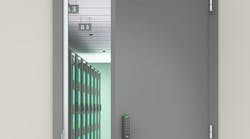
I was invited to what became the conversion of a floor closer to a floor pivot and the installation of a surface-mount door closer onto a narrow stile aluminum glass storefront door. The door had been having problems almost since construction. The floor closer was incorrectly installed, having almost no clearance at the pivot edge of the door at the closer. The arc cut into the cement floor was deep, another indication of this long term problem. In addition, the door was loose from the closer arm. The reason this door was not repaired sooner was that it is one of more than eight doors that could be used to gain entry into the building.
(View all article images on a new page)
Once the door had been removed, the floor closer was tested and it did not have sufficient force to properly close the door. At this point, a decision was made to install the National Door Controls neutralizer kit for offset floor closers and the LCN Quest surface-mounted door closer. The top-mount door stop would provide the mechanical stop for this door.
To remove the door from the jamb:
Step 1. Remove the overhead stop from the door and the header using a Phillips head screwdriver.
Step 2. Remove the cover from the offset closer using a Phillips head screwdriver.
Step 3. Loosen the arm using a 3/4” wrench.
Step 4. Remove the center pivot using a Phillips head screwdriver. The top pivot is left to be removed last as it will stabilize the door.
Step 5. Open the door 90 degrees. This should hold the door in place until you are ready to remove the door.
Step 6. Remove the top pivot screws.
Step 7. Tilt the door just out from under the header in order to remove the two halves of the top pivot.
Step 8. Tap the pivot side of the door to disengage the arm from the shaft. An alternative method is to use a small crow bar to lift the door at the pivot edge until the arm is off the shaft.
For this installation, the arm remained attached to the shaft while becoming disconnected from the bottom of the door.
Step 9. Walk the door away from the shaft. Carefully lay the door on its side in order to check the operation of the floor closer.
The next series of steps is to convert the floor closer to a bottom pivot and install the new conversion arm onto the bottom of the door. The NDC conversion arm has multiple mounting holes to accommodate a number of different floor closer manufacturers. For this installation the position of the conversion arm was moved back to provide additional space between the bottom of the door and the jamb.
Step 1. Determine the proper position for the NDC conversion arm on the bottom of the door. The desired space between the door and the jamb is approximately 1/8” to 3/16”.
Step 2. Install at least three screws to secure the NDC conversion arm through the space plate onto the bottom of the door. For this installation, four screws were used to secure the arm. To install the four provided self tapping screws, begin with a #7 bit to create the hole. Then use a 1/4-20 Tap or a 1/4-20 TEK screw to create the threads.
Step 3. Place the 7/8” diameter sleeve onto the shaft of the floor closer.
Step 4. Place the spacers onto the floor closer shaft. There are two spacers included. These spacers can be used to raise or lower the door in order to stop scraping.
Step 5. Place the bearing assembly over the sleeve.
Step 6. Place the bearing on top of the assembly with the concave side facing down. The bearing must be seated flat for the conversion arm to properly operate.
Step 7. Carefully install the door, making sure the conversion arm slides over the bearing assembly. Carefully swing the door open to approximately 90 degrees.
Step 8. Install the top pivot onto the door and the header. Test the swing of the door.
Step 9. Install the center pivot. Test the swing of the door.
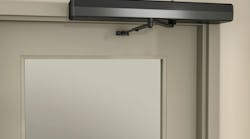
Next, we will install the surface-mount door closer. The LCN 1371 Quest door closer was chosen for this installation. It is non-handed and non-sized. These surface-mounted door closers are UL and ULC listed for self-closing doors without hold-open. They are certified under the ANSI Standard A156.4, Grade 1. The Quest Series closers meet the ADA reduced opening force requirements. The Quest Series 1371 closer accommodates ANSI sizes 1 through 5 and is designed for exterior doors to 42 inches wide and interior doors to 54 inches wide.
The Quest 1371 door closers use a mounting bracket to simplify the installation procedure. Self-drilling and self-tapping screws can eliminate the need for pilot holes in aluminum storefront doors. Stick-on templates help to locate the closer and arm for most of the installation options.
For this installation, the LCN Quest door closer had to be mounted on the push side (interior) of the door using the top-mount configuration. This was necessary as the door was equipped with a door stop whose bracket would have obstructed a parallel arm installation. The only other alternative was to mount the closer on the exterior side of the door. The decision was made that the closer had to be installed onto the interior side of the door.
IMPORTANT: Always check the operation of the door to be certain it will swing open and closed smoothly. If not, make adjustments or repairs as necessary.
Step 1. Separate the two parts of the Top-Mount template and attach the parts onto the door and header. Make certain the template is aligned the bottom and the edge of the header.
Step 2. Attach the shoe portion of the template aligning the top and edge of the door.
Step 3. Use a punch to mark the six locations for the mounting screws.
Note: For this installation, the locksmiths not only marked the center of the hole, but also marked the top, bottom, left and right side of the hole. This five-punch pattern insures that the mark for the hole is easily visible.
Step 4. Use a drill/driver to install the four self-drilling and self-tapping screws to secure the mounting bracket to the header.
Step 5. Attach the closer body to the mounting bracket and secure using the 5/32” hex wrench.
Step 6. Install the two self-drilling and self-tapping screws to secure the rod and shoe to the door.
Step 7. Preload the closer. Rotating the spindle ninety degrees moves the end point of the spindle rotation ninety degrees beyond the stopping point for the arm and the closing of the door.
Step 8. Attach the arm to the closer and insert the rod into the tube. Secure the arm using the Phillips head screw.
Step 9. Position the shoe arm perpendicular to the header.
Step 10. In this position, secure the shoe arm into the tube using the provided bolt using a 7/16” wrench. Test the operation of the door and closer.
The next series of steps is to adjust the door closer controls. For this installation, the LCN Quest 1371 door closer was equipped with: main speed adjustment, backcheck adjustment, latch speed adjustment and spring power
Step 11. Begin with the main speed adjustment. The main speed adjustment controls the closer movement of the door through the open position to about 15 degrees from the closed position. The main speed should be approximately seven to nine seconds. This time allows most persons to get beyond the door without being contacted by the door.
If the door does not swing towards closed with enough momentum, it may be necessary to increase spring power. If there is too much momentum, spring power should be decreased. The default spring power is approximately a three.
Every time there is an adjustment, it is important to test the operation of the door several times, making
Step 12. Adjust the backcheck. The door closer backcheck is designed to slow the opening speed and force before the door is completely open. However, a door closer equipped with backcheck cannot take the place of the physical stop. Using a door closer equipped with backcheck can improve the life expectancy of the closer as well as the life expectancy of the hinges/pivots and improve the door operation. Test the operation of the door.
Step 13. Adjust the latch speed. The latch speed, which latches and closes the door, should take approximately three seconds. There should be sufficient force to close and latch the door without slamming.
Step 14. Once the door closes appropriately, install the two end caps and the shaft cover.
Step 15. Install the stop. Test the operation of the door.
National Door Controls sells neutralizer kits for floor and overhead concealed closers. The kits make the door closers inactive, remaining in the floor or frame, and continuing to be a support for the door. A surface-mounted closer is then installed to provide closure. There are three models of neutralizer kits, the
National Door Control 100, 101, and 102. The NDC 100 neutralizes center-hung floor checks. The NDC 101 neutralizes offset floor checks. The NDC 102 retrofits overhead concealed closers. Contact Nation Door Controls for specifics.
The LCN Quest Series door closers options include delayed action cylinder, a hold-open arm, and standard or custom powder coat finishes.
For more information, contact your local locksmith wholesaler or:
LCN Closers, Railroad Ave., P.O. Box 100, Princeton, IL 61356. Telephone: 815-875-3311. Fax: 815-875-3222. Web site: www.lcnclosers.com.
National Door Control, P. O. Box 2502, Durham, NC 27715. Telephone: 800-231-0402. Fax: 919-220-6084.