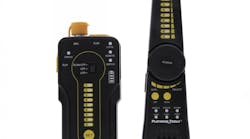
The latest generation of the Mustang is unlocked exactly like the previous generation. There is no lock on the passenger side of the vehicle, but the latch that Ford has chosen to use is equipped with a lock bellcrank just as if there were a lock on the door. The unprotected bellcrank can be easily attacked with a variety of tools such as the Tech-Train 1000.
To open the 2005 Mustang, begin by wedging open the weather stripping near the rear of the door and inserting the long end of the tool. Use care as you insert both the wedge and the tool to not roll the lower layer of the weather stripping. If the weather stripping rolls under your wedge, it will make the job harder and may damage the weather stripping.
Lower the tool at least 13 inches into the door and then rotate it so that the tip points toward the inside of the door. The latch bellcrank is located 12.5 inches down in the door, so the tip of the tool should now be below the bellcrank . Pull up on the tool to raise the bellcrank and unlock the car. If the car does not unlock, reposition the tool and probe for the bellcrank while watching the inside lock button for movement.
Inside the door, you can see how the tip of the tool attacks the unprotected bellcrank . The linkage to the vertical button can also be attacked with the same tool, but the bellcrank is much easier to find inside the door.
REMOVING THE DOOR LOCK
Since there is no lock on the passenger side door, the only door you will likely have to disassemble is the driver's side door. The panel is held onto the door with a combination of 10mm hex-head screws, Torx head screws and upholstery clips.
The triangular cover behind the rear view mirror is held onto the door with two metal upholstery clips. It can be removed with gentle prying, and once removed the electrical connection to the mirror control is easily disconnected.
A plastic cover inside the grab-handle portion of the armrest conceals one Torx head bolt that must be removed in order to remove the door panel. The plastic cover is removed by gently prying with a small screwdriver in the slot provided or with an offset scribe.
The forward portion of the armrest consists of a pod that contains the power control panel. The pod is held in place by four upholstery clips, two of which point down and two point toward the door. Once again, gentle prying is all that is needed to remove the pod. It is not necessary to remove the control panel; because once the pod is free of the door the electrical connections can be easily disconnected.
One 10mm bolt is concealed under the forward end of the control pod. This bolt must be removed in order to remove the door panel.
Another Torx head screw that must be removed is concealed behind a plastic snap-off panel inside the handle trim. ( The panel can be removed by prying gently with a screwdriver or an offset scribe.
Seven easily visible 10mm screws secure the door panel to the door. Two screws are located along the front edge of the panel, two along the rear edge and three more on the lower edge.
After all of the fasteners have been removed, the panel can be removed from the door by gently lifting from the lower edge. Two hooks near the bottom of the door panel fit into the door skin and the top portion of the panel hooks over the top of the door. Once the panel is free, you can see the remaining connections that have to be released.
The inside handle is connected to the latch by way of a bicycle-style cable. The cable is released by gently squeezing the two plastic tabs on the cable end together so that the cable housing can slide out of the mounting bracket. Once the cable housing is free, rotate the cable until the lug on the end of the cable can be lifted out of the slot in the handle.
After the handle cable has been released, you will be able to pull the door panel far enough away from the door to easily reach the remaining electrical connections. The power door lock connection is located just forward of the inside handle.
The speaker wire is the last connection on this vehicle that must be released, but other variations may have more than one speaker connection and / or courtesy lights that must be disconnected before the panel can be removed.
After the panel has been removed, put it in a safe place. I usually put it in the back seat so that it is out of the way and out of the weather. Notice the two hooks in the lower portion of the panel that fit into the door skin. The entire panel has to be lifted in order to release these hooks. Attempting to pry the panel free can break the hooks.
A clear plastic moisture-barrier is secured to the inner skin of the door with a bead of black butyl-rubber adhesive, which I refer to as “goop.” As you are working on the door, make sure that you do not cut or tear the moisture barrier. This will allow moisture to seep into the door panel causing rot, mildew, and electrical problems.
Carefully peel the upper rear portion of the moisture-barrier free of the goop, so that you can reach inside the door to remove the door lock. The hole that is exposed just to the rear of the vertical lock linkage is used to access the 10mm screw that secures the lock into the door.
The electrical switch on the back on the lock is connected to the wiring harness by a connector that is fastened to the inner door skin. This connector must be disconnected before you can remove the lock. (Photo 19)
The lock is secured to the door by a single 10mm hex-head screw that is visible through the hole in the inner door skin that I mentioned earlier. After the screw has been removed, and the linkage rod disconnected, the lock must be rotated until the tab on the lock aligns with a slot in the door skin. At that point, the lock will come free of the door and may be removed.
The armored cover over the lock does not have to be removed since the lock comes out from the inside of the door.
DOOR LOCK DISASSEMBLY
After the lock has been removed from the door, the disassembly is fairly typical of other Ford 8-cut locks. The cam is secured to the plug with an E-clip, and once that clip has been removed, the cam and the electrical switch slides free of the lock. Make sure that you mark the switch and the lock housing in such a way that you can put the switch back on in exactly the position that it was in before you started.
The face cap on the lock is reusable and can be easily removed after the tabs have been carefully pried out. There are no codes stamped on the door locks of any modern Ford. Ignore any numbers that you happen to find on these locks, since they are usually casting numbers and have no connection to the key code.
The door lock is equipped with a return-spring that must be removed before the plug can be removed from the housing. It can be released with an offset scribe or a screwdriver. Note the way that the spring is wound so that you can replace it in the same way it came off.
After the spring has been removed, that lock plug should slide easily out of the lock housing. These locks are designed to operate with white lithium grease, so be sure to replace any grease that you remove while servicing the lock as you reassemble it. This vehicle uses cuts 1 – 6 in the door lock, but later models use cuts 2 – 7 in the door lock. It is very important therefore that you make sure which bitting you are working with if you are decoding the door lock.
The door lock uses standard Ford 8-cut tumblers. All of the tumblers are stamped with their corresponding depths.
OPENING THE TRUNK
The deck lock is recessed behind the trim, which makes the lock difficult to pick. There is no inside trunk release, so if the keys are inside the trunk or the trunk lock has been damaged or malfunctioned, unlocking the trunk can be a problem. However the electronic trunk release can be activated from under the hood.
The “ Bussed Electrical Center ” or “BEC” is located inside the engine compartment on the left side of the compartment, against the fender and just to the rear of the windshield washer fluid reservoir. The cover on the BEC can be removed without tools, by releasing the plastic clips on each end.
Once the cover has been removed, you will see three rows of plug-in relays. The trunk release relay is the one closest to the front of the car in the center row.
Gently remove the trunk release relay out of its socket by rocking it slightly from side to side while pulling up. Make sure that you make a note of how the relay was installed so that you can replace it exactly as it came out once you're done.
Momentarily short the two sockets closest to the front of the car that the relay was plugged into. You can use a paperclip or a short piece of wire as shown here to short the contacts. As soon as you make the connection, you should hear the trunk release, and the trunk will pop open. Do not short the contacts any longer than necessary to release the trunk. Use this method at your own risk. Any time you jump an electronic connector, you run the risk of blowing a fuse, which is why I recommend that you carry an assortment of replacement automotive fuses with you.
DECK LOCK removal
Once the trunk is open, the lock can be accessed relatively easily. A removable plastic shell surrounds the latch mechanism and the lock.
The shell is held in place with two metal clips that grip two plastic tabs on the shell. Use care as you pry the shell free; the plastic tabs would be very easy to break. Once the shell is free, you will have to disconnect the wire from the courtesy light if equipped.
The lock is equipped with a microswitch that must be disconnected before the lock can be removed from the deck lid.
The tailpiece of the deck lock drives a cable that releases the latch when the key is turned. In order to remove the lock, you will have to disconnect the cable attachment. This unit snaps over the end of the lock and can be released by gently bending the plastic tabs up as you pull the unit free of the lock.
The lock is secured to the deck lid with two 10mm bolts. Once the bolts have been removed the lock will come free of the deck lid.
Part 2 of Steve Young's Guide to Servicing The Ford Mustang will address removal and disassembly of the ignition lock, key generation and key programming.