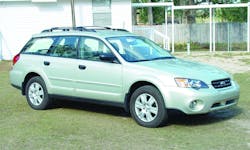
I had the misfortune to blow the engine in my car a while back and while my car was being repaired, I rented a Subaru Outback (Photo 1). This was one of my first experiences with a Subaru because the closest Subaru dealer is 60 miles away. The car itself was nice to drive and I see why the folks up north like them so much for winter driving. The heated seats were a decadent luxury for me here in north Florida in January. The locks on the vehicle were straightforward. The only thing that I didn’t like about the car was that the door lock controls, both manual and power, were the reverse of everything else I’ve ever dealt with.
UNLOCKING
Because all 2005-and-up Subaru products are equipped with a bicycle-style linkage inside the doors, using traditional inside the door car-opening tools is not practical. An under the window tool like the Tech-Train 1015 tool can be used on either the front door or the rear door. The rear door is generally easier because the fit of the weather stripping is not quite as tight. I use a wooden wedge on either side of where I plan to insert the tool (near the center of the door). Because the Outback uses multi-layer weather stripping, it’s important to use a plastic shim when inserting the wedges and the tool. If you don’t shim the lower layer of the weather stripping, it will roll under your tool and make the job harder or even damage the weather stripping.
Once the upper bend of the tool is below the base of the window glass, remove the wedges in order to relieve the pressure on the glass and make it easier to raise the tool. Failure to remove the wedges can over-stress the glass and may result in a broken window. Carefully pull the tool up inside the vehicle until the end of the tool pops free of the weather stripping. (See Photo 2)
Once the tip of the tool is free inside the vehicle, manipulate the end of the tool until you can operate the inside lock control rocker. (See Photo 3) The rocker on most Subaru products must be moved forward in order to unlock the door. This is the opposite of almost every other vehicle on the road. Because of the multi-layer weather stripping on the inside of the glass, you will need to use your shim again on the inside of the door to help remove the tool after the vehicle is unlocked.
An alternate way of unlocking the Outback is to use a long-reach tool such as the Jiffy-Jak Vehicle entry system shown in Photo 4. Because the Outback uses a “sashless” window system, which has no frame around the upper portion of the glass, you will have to exercise caution as you use a long-reach tool. For that reason, I prefer the first method. If you choose to use a long-reach tool, begin by carefully inserting an inflatable wedge between the glass and the door pillar.
After inflating the wedge slightly, insert a sleeve between the glass and the door pillar to prevent scratching. In this case, I’m using the sleeve that comes with the Jiffy-Jak kit, but a variety of different types of sleeves are available. In a pinch you can even use a flattened toilet paper tube. The main idea is to protect both the glass and the door pillar from your tool as you use it inside the vehicle. (Photo 4)
In order to minimize the stress on the glass, I’ve removed the rubber tip from the long-reach rod and protected the end of the rod with duct tape. A small piece of surgical rubber tubing can also be used over the threaded portion of the tool. You want to make sure that the bare end of your tool does not scratch the trim on the inside of the vehicle as you unlock the door. (See Photo 5)
Once the tool is inside the passenger compartment, you can use the end of the rod to operate the inside lock control rocker. Once again, the rocker moves in the opposite direction of almost every other vehicle on the road.
On many new vehicles, the inside power door lock controls are disabled when the door has been locked with the key or the remote, or when the security system is active. On the Outback however, the power door lock control will operate even when the doors have been locked from the outside. The tip of the rod can be used to push down on the power door lock control and unlock the door. The power door lock control on the Outback, just like the manual rocker, moves in the opposite direction from most other vehicles. (Photo 6)
Door Lock Removal
In order to remove the door lock, which is the only exterior lock on the vehicle, the door panel must be removed. The door panel is secured to the door with three Philips head screws and a number of upholstery clips around the perimeter of the panel. The three screws are indicated by the arrows in photo 7.
The trickiest part of removing the Outback door panel is removing the outer cover from the door pull. (See Photo 8) The two main screws that secure the door panel are hidden inside the door pull, and the cover fits very tightly. I use my fingernails to pull the cover out as far as possible and then carefully insert a wooden wedge into the gap. As you work the cover free of the door, use caution not to scratch the trim.
After the cover has been removed, you will find two Phillips head screws, one at the top and the other at the bottom of the handle. These are the largest fasteners used on the door because they get the most stress as the door is closed. When you reassemble the door make sure that you retighten these screws securely.
The triangular trim at the forward top portion of the door panel needs to be removed before the door panel can be lifted free of the door. This is a plastic part with a single upholstery clip securing it to the door. Carefully pry around the edges of the trim until it pops off. See Photo 9.
Inside the handle trim, a plastic cover conceals one screw. The cover has a small rectangular opening at the top. Inserting a small screwdriver into the slot will allow you to gently pry the cover free of the handle trim. (See Photo 10)
After the cover has been removed, the Philips head screw can be removed, and then the door panel can be removed from the door.
A series of upholstery clips are around the edge of the door. (See Photo 11) I try not to use any tools other than my fingers to remove these to avoid scratching the paint. If I do have to use a clip removal tool, I’ll start at the bottom of the door panel so that if I do scratch anything, it will not be noticeable.
When all of the upholstery clips have been removed, two wiring connections and the cable linkages must be disconnected before the door panel can be removed. The ends of the two bicycle-style cables that connect to the inside handle assembly are hidden behind this snap-open cover. Gentle prying at the rear end of the cover will expose the cable ends. (See Photo 12)
Once the cable ends are visible, they can be disconnected from the handle. Then the cable housings can be unsnapped from the plastic frame that supports the handle assembly. This will allow you to tilt the door panel out far enough to give you easy access to the remaining two electrical connections. (See Photo 13)
The main electrical connector to the switch assembly can now be disconnected. The connector is secured by a small plastic tab that can be pressed down either with your finger or a small screwdriver in order to release the cable. (See Photo 14)
The last wiring connection is to the courtesy light mounted at the bottom rear corner of the door panel. This connector uses a standard snap together fitting that can be removed easily with a small screwdriver. (Photo 15)
After the moisture barrier has been peeled down at the top rear of the door, you will have access to all of the lock connections. The lock itself is secured to the door with a single 10mm bolt that can be accessed through a hole in the inner door skin.
The electrical switch that is mounted on the rear of the lock is connected to the wiring harness by way of this connector on the inner skin of the door. The connector is similar to the connector on the courtesy light and can be disconnected easily with a small screwdriver. (Photo 16)
The linkage rod that is connected to the tailpiece of the lock will have to be disconnected by feel once the lock is free inside the door. There is very little room to work in this area and it is virtually impossible to see the lock while your hand is in a position to disconnect the linkage rod. Once the linkage rod has been disconnected, the lock can be removed from the door. (Photo 17)
The door lock contains tumblers in the positions 3 – 10, so if the door lock is decoded, you will only have to progress two cuts for a finished key. The drain hole in the lock casing is large enough that you can read six out of eight of the cuts without having to disassemble it any further. With a little progressing, you can determine the remaining two cuts. The lock is relatively easy to disassemble, so if you’ve gone this far, you might as well pull the lock plug out.
The switch on the back of the lock just snaps on and off. A little gently prying will allow you to remove it easily. Whenever I remove a switch like this, I always put a mark on the switch and the casing so that I can be sure that I put back on correctly. (Photo 18)
The tailpiece is secured to the plug with a standard E-clip that can be removed easily with a screwdriver or a scribe. Once again, I usually put a mark on the tailpiece so that I can put it back on exactly as it came off.
As you remove the tailpiece, make sure that you do not dislodge the return spring that is mounted below it. Before you remove the spring, make sure that you know how it is wound on the plug so that you can put it back on correctly. (Photo 19)
The face cap is reusable, but it is crimped on in two places. A little more gentle prying will allow you pull the face cap off of the lock. (Photo 20)
Once the face cap has been removed, the plug will slide out of the housing. The shutter assembly has two tabs that snap over the outer edges of the plug. Unless you are removing a broken key or something of that nature, there is no reason to remove the shutter.
With the plug removed from the housing, you now have access to all of the tumblers and the lock can be easily decoded or serviced at this point. Notice that like most new vehicle locks, this one is packed with grease. If you clean up the lock in order to work on it, make sure that you re-grease the plug before you reassemble it. (Photo 21)
Part 2 of Steve Young’s Guide to servicing the 2005 Subaru Outback will address the glove box lock, ignition lock and transponder programming.


