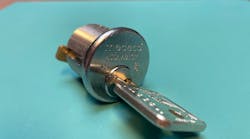
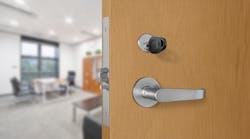
Electronic locking systems have been popular for many years in commercial applications. Electronics have also been applied to automotive security beginning with a VATS system on the 1986 Chevrolet Corvette. Electronic door hardware for residences is probably the most significant area in terms of possible sales volume but this area has lagged behind in available products.
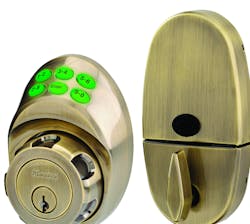
Master Lock now has a new electronic security product developed especially to meet the needs of the residential market. Features include a 'weather tough' keypad ready for harsh outdoor use, key cylinder backup with BumpStop technology and the NightWatch locking system to lock out all keys and codes. After the door is locked, owners can press a button on the bottom of the inner escutcheon and simultaneously pull outward on the thumb turn. This NightWatch system makes the thumb turn rigid and prevents anyone from unlocking the door from the outside.
Although the primary feature is keyless entry, a variety of cylinder keyways are available including Kwikset, Schlage C, Schlage E, Yale, Segal, Arrow plus the Master recodeable key system.
The keypad has six buttons labelled 1-2, 3-4, 5-6, 7-8, 9-0 and 'enter'. Code numbers of 4 to 10 digits can be used. The Master Lock Keypad Deadbolt can hold up to 20 individual user codes. Locks are factory-set with two user codes. To operate the lock, press any button to activate the keypad. The keypad will illuminate in blue, indicating it is ready to operate. Next, enter a valid user code and then press the 'enter' button. The keypad will illuminate in green when a valid code is entered. A dial surrounding the lock cylinder is normally freewheeling. When the keypad is illuminated in green, the dial clutch engages and the dial can be turned to unlock the lock.
When leaving home, the inside thumb turn must be turned to unlock the door. Next, the 'exit' button located on the inside escutcheon plate must be pressed. This activates the clutch mechanism and also sets the keypad to flashing green. After closing the door from the outside, the homeowner has 15 seconds to turn the dial and lock the deadbolt before the dial clutch disengages and the keypad is no longer illuminated..
While at home, the owner can choose to set the NightWatch feature. A release button is located on the bottom of the inner escutcheon plate. With the lock in a locked position, the owner can push up on the release button and simultaneously pull outward on the thumb turn. This sets the thumb turn into a rigid position and prevents anyone from entering either with the proper key or a valid user code. The NightWatch feature can be released at any time by pushing inward on the thumb turn.
Programming
A factory-set administrative code must be used for all programming functions. Individual factory-set administrative and user code numbers are printed in the front of each user guide book. The upper portion of the inside escutcheon must be unsnapped and removed when reprogramming the Keypad Deadbolt.
Add a User Code:
Locate the program button located on the printed circuit board.
1) Press the program button until the keypad begins to flash blue.
2) Enter the digits of the administrative code
3) Press the '1-2' button, then press 'enter' (sets lock to new code programming mode)
4) Press the new user code digits, then press 'enter'
5) Re-enter the new user code digits and again press 'enter'
If the new code is confirmed, the keypad will illuminate in green. If the keypad iluminates in red, the code was not accepted and the programming steps must be repeated. Note: Since each button contains two numbers, codes such as 1111 and 2222 will be recognized as the same code. The keypad will flash red if the new code number is already found in memory.
Remove A User Code:
Locate the program button located on the printed circuit board.
1) Press the program button until the keypad begins to flash blue.
2) Enter the digits of the administrative code
3) Press the '3-4' button, then press 'enter' (sets lock to the delete user code mode)
4) Press the code number to delete, then press 'enter'
5) Re-enter the code number to delete and again press 'enter'
If the code was deleted, the keypad will illuminate in green. If the keypad iluminates in red, the deletion was not accepted and the removal steps must be repeated.
Change the Administrative Code:
Locate the program button located on the printed circuit board.
1) Press the program button until the keypad begins to flash blue.
2) Enter the digits of the administrative code
3) Press the '5-6' button, then press 'enter' (sets lock to the change administrative code mode)
4) Press the digits of the new administrative code, then press 'enter'
5) Re-enter the digits of the new administrative code and again press 'enter'
If the code was accepted, the keypad will illuminate in green. If the keypad iluminates in red, the code was not accepted and the administrative code steps must be repeated.
Remove all User Codes:
Locate the program button located on the printed circuit board.
1) Press the program button until the keypad begins to flash blue.
2) Enter the digits of the administrative code'
3) Press the '7-8' button, then press 'enter' (sets lock to the user code removal mode)
4) Press the digits of the administrative code, then press 'enter'
5) Re-enter the digits of the administrative code and again press 'enter'
If the code deletion was accepted the keypad will illuminate in green. If the keypad iluminates in red, the codes were not removed and the removal steps must be repeated.
Deactivate / Reactive Codes For A Period Of Time:
Locate the program button located on the printed circuit board.
1) Press the program button until the keypad begins to flash blue.
2) Enter the digits of the administrative code
3) Press the 9-0' button, then press 'enter' (sets lock to the deactive/reactivate code mode)
When deactivation or reactivation is completed, the keypad will illuminate in green. If the keypad iluminates in red, the codes have not been deactivated or reactivated and the steps must be repeated. Note: The same steps are used to change from activation to deactivation or from deactivation to reactivation.
If A New Administrative Code Is Forgotten:
Locate the program button located on the left side of the printed circuit board. Locate the exit button located in the center of the printed circuit board.
1) Press the program button until the keypad begins to flash blue.
2) Press the program button and the exit button simultaneously and hold them in until the keypad color remains solid blue. This will take about 60 seconds.
3) When the keypad stops flashing and remains solid blue the administrative code has been reset to the original factory code and all user codes have been removed.
Installation
A standard cylindrical deadbolt cutout of 2 1/8 inch crossbore and a 1 inch edge bore is used. No extra mounting holes are required, so the Master Lock electronic deadbolt can replace an existing key-operated cylindrical deadbolt without additional door modifications. Packaging includes two deadbolt latch units, one for a 2 3/8 inch backset and one for a 2 3/4 inch backset.
Latchbolts have a small projection at the center point of the bolt. After the lock is installed in the door during a new installation, rotation of the thumb turn will move the latchbolt against the door jamb and the small projection will make a perfect indent in the jamb for centering of the strike plate cutout.
Installation of components is similar to the installation of a standard cylindrical deadbolt. Small grooves in the latch hub must be set in a vertical orientation before engaging the hub and cylinder tailpiece. Two wire cables must be inserted through the inner escutcheon plate before attaching the inner escutcheon. Care must be used to follow the printed directions for running and connecting the wiring cables. Two long retainer screws are used to fasten the inner the inner and outer escutcheon plates to the door.
Complete the installation steps by snapping the inside trim covers in place. An Allen wrench is included for tightening the thumb turn retainer set screw. Install the thumb turn on the shaft so it is vertical when the lock is unlocked.
The Master Lock Electronic Keypad Deadbolt is easy to install, simple to use and includes every security feature that a homeowner could possibly desire. It should make a profitable addition to the product lineup for every locksmith.
For further information contact your local distributor or: Master Lock Company 800-308-9244, www.masterdoorlock.com.
